How To Sync Flash With Trigger Godox? 5 Eassy Steep
As a beginner, you must be very excited to shoot. After arranging the required equipment, many first-timers lose interest while setting them up. It’s indeed complicated but leaving it in the middle is not cool either. I bet that’s why you are wondering, ‘How to sync flash with trigger Godox?’
After turning on the flash & trigger, set the flash on ‘Radio Slave’ mode. Match up the trigger’s channel and group with the flash, and that’s it!
Are you still confused? Don’t panic; we have come up with a step-by-step section to guide newcomers like you. So, get your skates on and sync up the flash with a trigger to enjoy some outstanding photoshoots now!
What Is A Flash Trigger?
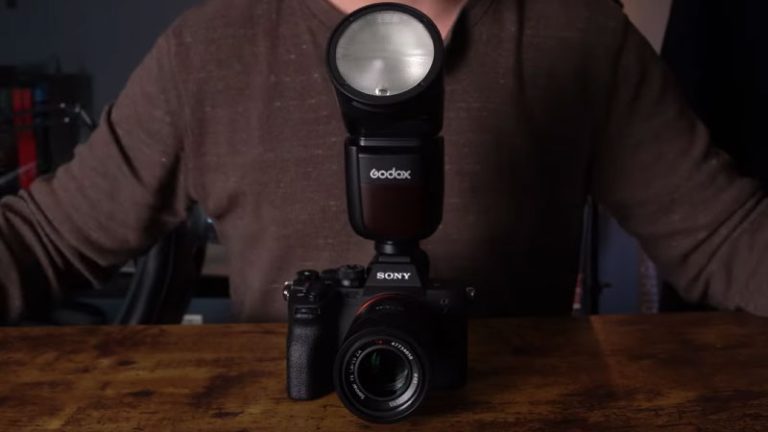
Every photographer wants to infuse the best in their photoshoot. Firing the flashlight at the most appropriate time is indeed the key in this regard. That’s why you will require a wireless flash trigger. It is basically a device responsible for connecting the camera & the flash without proper physical contact. The wireless bodies come with a transmitter and a receiver.
Now you may wonder, is the Godox flash trigger compatible with each & every flash? Actually, no, there are brands that have designed flash triggers only for specific camera flashes. For instance, Godox XT- 16 and Godox TT350 are a perfect match for Godox Ad200.
How To Sync Flash With Trigger Godox?
Step 1: Connect The Camera With The Trigger
- Place the trigger on the DSLR.
- Once the connection is established, the ‘camera’ icon will show up on the trigger’s screen.
Step 2: Set Up The Radio Slave Mode On The Flash
- Look for the ‘two arrow icon’ on your flashlight. It’s probably the furthest icon of the Speedlight.
- Click it multiple times until the ‘Radio’ & ‘Slave’ icons appears on the screen.
Now the Speedlight is in slave mode and won’t fire until it receives a signal from the trigger.
Step 3: Match The Speedlight With The Triggers Channel
Every flash & trigger features around 1 to 32 channels to prevent nearby triggers from shooting your flash accidentally. In order to pop the flash, the channels of the trigger & flash must be synchronized together.
- Press & hold the ‘Ch’ button on the trigger.
- Now turn the wheel as required and select your preferred channel.
- Move to the flash and use the same Ch button & wheel to find the previously selected channel.
Step 4: Match Up The Groups
Generally, triggers feature multiple groups from A to E. In this system, more than one Speedlight can be assigned together to one group.
- Tap on the left switch just beside your desired group.
- Press on the mode button twice to enable the manual mode.
- Go to the flashlight and keep tapping on the ‘Gr’ button until your pre-selected group appears.
Step 5: Get Ready For The Photoshoot!
- Press on the test button of the trigger, and the flash will pop spontaneously.
- Check out the previous steps again if the flash doesn’t pop in spite of the radio signal from the trigger.
Once the trigger and Speedlight are synchronized to the same channel & group, you are ready to fire.
How To Adjust The Flash Power?
Once the trigger is synced with the flashlight, adjusting the flash power is just a two-second task.
- Tap on the button just beside your desired group letter.
- Rotate the wheel and set the power as per requirements.
- You will see simultaneous changes in the power of the flashlight.
- Once you have reached the preferred power, click on the set button.
FAQ:
How do I connect Godox triggers with flash?
- Turn on the trigger and the flash.
- Set the Speedlight into ‘Slave mode’ so that it doesn’t pop without any Radio signal from the trigger.
- Set a channel (1-32) in the trigger and match the flash up with it.
- Select a group (A to E) in the trigger and assign your flashlight to the pre-selected group.
Once the synchronization is complete, the Speedlight is ready to fire!
What triggers are compatible with Godox ad200?
The most compatible trigger for Godox ad200 is XProNtrigger. Besides, Godox XT-16, TT350, and X1T wireless triggers can also work with ad200.
How To sync Godox ad200 with the trigger?
- Turn on the Godox ad200 and the controller/trigger.
- The Speedlight will be on channel 21, group A by default. The controller will probably be on Channel 1 group A. Now you have to get both of them into the same channel.
- You can change the group just by tapping on the upper left button on the light. Just remember to keep the trigger and the flash in the same group as well.
- Press and hold that upper left button of the ad200 flash for two seconds. Now turn the wheel and set your preferred channel on the Speedlight.
- You can choose from any from 1 to 32. I personally prefer high frequencies as many 2.4GHz objects operate on 1 to 12 frequencies.
- Once you have found your preferred channel on the flash, press the set button in the middle of the wheel.
- Now go to your controller. Press & hold the bottom left Zm/Ch button. Rotate the wheel, and the channels will change simultaneously. Now select the same channel as the Speedlight.
- Once they are synced, tap on the corresponding group on the trigger, change the power output, and the power of the light will also change automatically.
Thus, your Godox ad200 is synced with the trigger.
Final Words
How to sync flash with trigger Godox? After going through our step-by-step guidelines, I believe you are not confused anymore. As a beginner, syncing the trigger and flash together is not easy indeed. However, once you get the gist, it’s totally like biting a piece of cake. So, have you synchronized your Godox flashlight with the trigger for the photoshoot
Camera Flash Guide For Filminglab Readers
Flash For Cano R6
Flash For Canon 5D Mark iii

I am Terry E. Collin.
I have some top branded cameras, especially Canon R6, Canon EOS 60D and 70D, Nikon D700, Lumix G9, Lumix G85, and many more. I have been doing photography for 5 years with Top Brand cameras like Canon, Sony, Nikon, Panasonic, etc.
The purpose of creating this blog is to share my personal experience and expertise with most popular cameras.
Let’s share some of them one by one in this blog For FilmingLab Audience